
I remember back in September when I decided to write this post. A post about building a simple Go app to then deploy it to AWS. How foolish of me to think I could do it in a single post. I realised pretty fast the need to split it into two, then three, then four posts if you count the testing related one. But here we are at long last. It is time for the final episode of my Go Cloud trilogy where after building a Go app, then making it cloud-ready we will finally move it to the cloud using AWS Fargate.
Writing these entries took me through a crazy journey where I got to better acquaint with Go’s project structure standards, testing implementation and other patterns. This was the perfect occasion for me to take advantage of a newly learnt language while refreshing myself on deploying something to AWS.
Pushing the docker image to the container repository
First, we need to create an ECR repository. AWS has very good documentation on how to achieve that so I’ll direct you to follow it. It’s fairly short but will remain up-to-date and done better than I ever could.
Next, I will need a way to create a container so start the application, one way of doing that is using AWS Fargate. For that to happen I will need to build and push my app image to AWS ECR first. That one bit I don’t believe I can achieve through CloudFormation so it might be very close to what we will do with continuous deployment later on.
To build and tag the image. In order to create a valid ECR tag, you need it to comprise your AWS account id (AWS_ACCOUNT_ID), the region containing the registry (REGION), the repository/app name (cloudreadytodo) and version (latest). Here is what the shape of a tag would be:
AWS_ACCOUNT_ID.dkr.ecr.REGION.amazonaws.com/cloudreadytodo:latest
Now that we have our tag, we can run this command and don’t forget the dot at the end:
docker build -f build/package/Dockerfile -t AWS_ACCOUNT_ID.dkr.ecr.REGION.amazonaws.com/cloudreadytodo:latest .In order to push the created image, we need to authenticate to AWS ECR. This can be done through the AWS CLI’s ECR get-login-password command like this. I used version 2 of the CLI which has installation instructions here.
aws ecr get-login-password \
    --region REGION \
| docker login \
    --username AWS \
    --password-stdin AWS_ACCOUNT_ID.dkr.ecr.REGION.amazonaws.com
Once we’re authenticated, we can push the image we created using our new tag.
docker push AWS_ACCOUNT_ID.dkr.ecr.REGION.amazonaws.com/cloudreadytodo:latestNow that the image is ready to use, we can go ahead and build a Fargate task that will launch our application.
Deploying our database
You can easily create a DynamoDB table in the AWS console.

You can select TodoList as table name and id as the Primary key. The default settings are good enough for our purpose. Once you filled these you can select “Create”.
Once the table is created, you can take note of the table’s ARN (Amazon Resource Name) as we will need it to setup permissions for our app to talk to it. You can find it there.

Now that the table is ready, let’s get our application started.
Creating permissions for the application to talk to DynamoDB
In order to allow the application to talk to our newly created DynamoDB table, we need to create a new IAM role. IAM is a free AWS service that basically allows to define policies for groups or users that will frame what resources they can interact with, either directly or through roles.

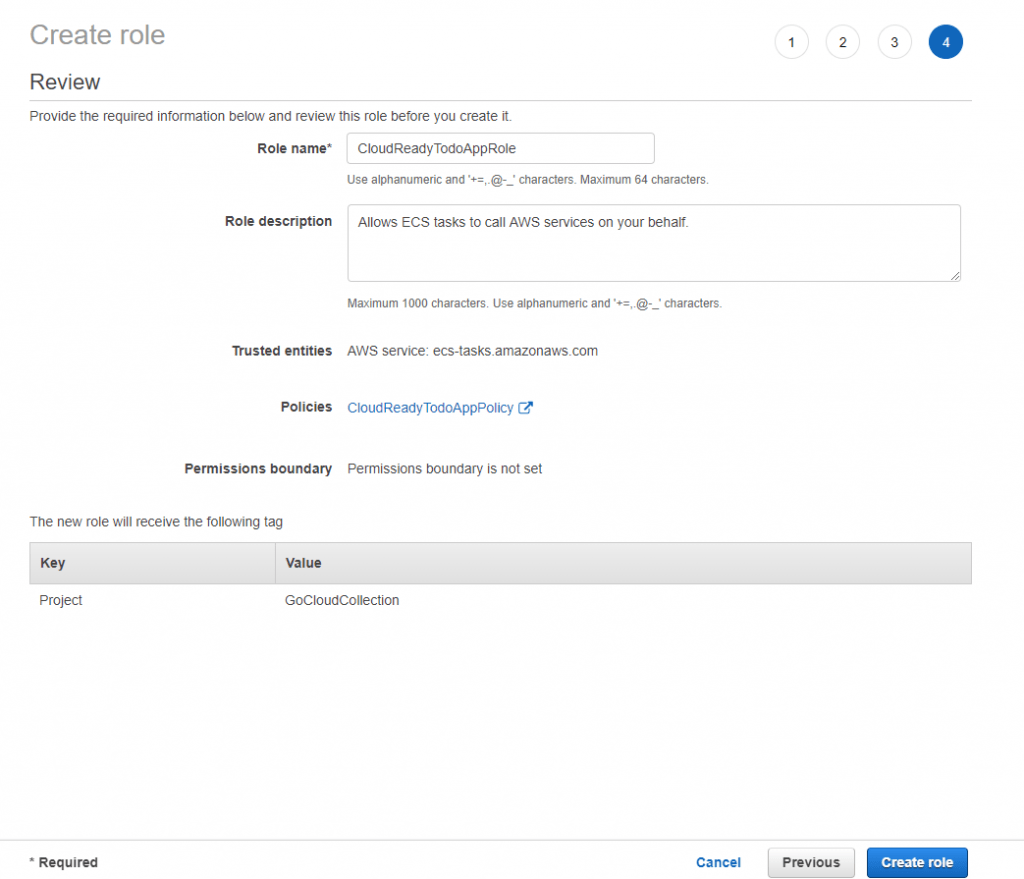
Here I will create a role named CloudReadyTodoAppRole. Upon clicking “Create Role”, we need to select a use-case so that the console can suggest us some recommended values. Fargate provides a way to create ECS Tasks which execute containerised applications. ECS stands for Elastic Container Service and this is what we will pick as service here:

Then we pick “Elastic Container Service Task” since this is what we will execute our app through and select “Next”.

Then there is a screen to select a policy, you can create it beforehand or do it on the spot. With the JSON editor you can set it by pasting this.
{
    "Version": "2012-10-17",
    "Statement": [
        {
            "Effect": "Allow",
            "Action": [
                "dynamodb:PutItem",
                "dynamodb:Scan",
                "dynamodb:UpdateItem"
            ],
            "Resource": "arn:aws:dynamodb:REGION:AWS_ACCOUNT_ID:table/TodoList"
        }
    ]
}
If you are copying this, remember to replace REGION and AWS_ACCOUNT_ID with the relevant values. In order to be as secure as possible, the policy is restricted only to what the application requires. I only require permissions for the calls used by the application. Also, I specify the resource to limit their usage to the TodoList table where we store our to-do list items.
Once we created the policy, we can hit the refresh button on the role creation screen and select our created policy. I named mine CloudReadyTodoAppPolicy. because I’m original like that.

Once the policy selected, you can finish creating the Role.
Create ECS Cluster
In the console search for ECS / Elastic Container Service. Once there, select Clusters. This should land you to the screen below.

After pressing “Create Cluster” you will reach a cluster template selection screen. Here, “Networking only” is the default and the option we will use.

Now you should see more details to complete. As we will be creating Fargate tasks, we will need to create a VPC to contain these. This is why I ticked the “Create VPC” option, keeping the default values is fine.

Now you can press “Create”, the command will generate the cluster resources and it will take a few minutes.

Defining how our application will run with Fargate
Now that we have the cluster where our task will be executed, let’s define how our contained app will run. To do that, we will create a task definition.

We are going to create a Fargate task, mostly because I said so but also because that’s what I want to explore today.

Next, we define the name of our task and also the role we defined previously for our application as “Task Role”.

Leave the task execution role blank, this will be created for us automatically and will have the right permissions. Scrolling down, we reach memory and CPU settings for our task. I picked the lowest values as the container shouldn’t require much for our example.

It is finally time to create our container definitions. Press “Add container”.

From there, we will set our Container name, image and port. The application port is 8080 so that is the one we use here. The image will be the full tag that we pushed earlier following the format AWS_ACCOUNT_ID.dkr.ecr.REGION.amazonaws.com/cloudreadytodo:latest.

After selecting “Add”, the container definition will be added to our task definition. Then, scroll all the way down and click on “Create”. The task definition will be created almost instantly.

Back to our cluster.
Creating our ECS service to run our application task
Our task definition being ready, we can return to our cluster. Back to “Clusters” then select the cluster we created previously.

Now you should see that we have no service running, let’s create it by pressing the “Create” button from the “Services” tab. Next, select “FARGATE” launch type, pick the cluster and task definitions we just created. Enter the service name, here I chose CloudReadyTodoService. As for the number of tasks, “1” is more than enough here.

Now for the network configuration part, we can choose the VPC and subnets created alongside the cluster earlier.

We don’t need a load balancer here since we only have one task running but if we had several then it would be useful to have one. In our case, we would have gone for an application load balancer which we’d need to create.
For now, we need to create a new security group. By default, this process creates one that will let inbound connections if they go through the port 80. However, if we recall the previous steps, our application listens to requests on the port 8080 so we need to change that. Click on the “Edit” button of the “Security groups” line. This will give you the screen below:

Here I’ve already made the change. I updated the Type column from “HTTP” to “Custom TCP” which then allowed me to change the port range to 8080. Once you also have these changes in you can save them.
Next, scroll all the way to jump on the next step. Press “Next step”.

Next, the auto-scaling settings. These allow to ramp up or down the number of tasks we’d want to run depending on the network load against our application. No need for that now. Leave the default setting and press “Next step” to reach the final step.

Now you’re on the review screen which you can see below. Double-check that it looks good and press “Create Service”.

It might take a couple of minutes for the service to start but eventually, you should be able to see it from your Cluster. Once you select your service you should see the screen below:

As you can see the service is active with a task in the running state. You need to select the “Tasks” tab from there. Select the task to see more details.

Retrieve the IP and enter it in your browser bar to access the pending tasks endpoint following that format http://<PUBLIC_IP>:8080/tasks/pending.

Now we know that our endpoint is up. Let’s test it a further.
Return of the postman that is not Kevin Costner
Yes, here we are again, Postman. If you recall, we already have a postman collection. All we need to do is introducing a new environment where the URL is our IP alongside the port. Let’s duplicate our existing environment in Postman:

Next, let’s update the todo_api variable with our deployed address.

Now we can execute our collection against our deployed application. Let’s do that:

All our tests go green which means that we successfully deployed our application. Sometimes things working on the first try feel too good to be true so let’s check our DynamoDB table. Maybe we pushed the in-memory image instead of the one talking to our database.

As you can see, we now have an todo item in the DynamoDB TodoList table.
Wrapping up
This was originally meant to be a single blog post covering building a Go application and pushing it to the cloud but we actually covered a bit more than I thought originally.
We now know how to:
- Structure of a Go app using DDD.
- Analyse the what we need to test in an API.
- Containerise our application into a docker image
- Now we also know how to deploy our containerised image using AWS Fargate.
Now you have the tools to build a Go app, test it, containerise and deploy it to AWS. That was quite the journey. Thanks for reading and see you next time where I will introduce you to CloudFormation.